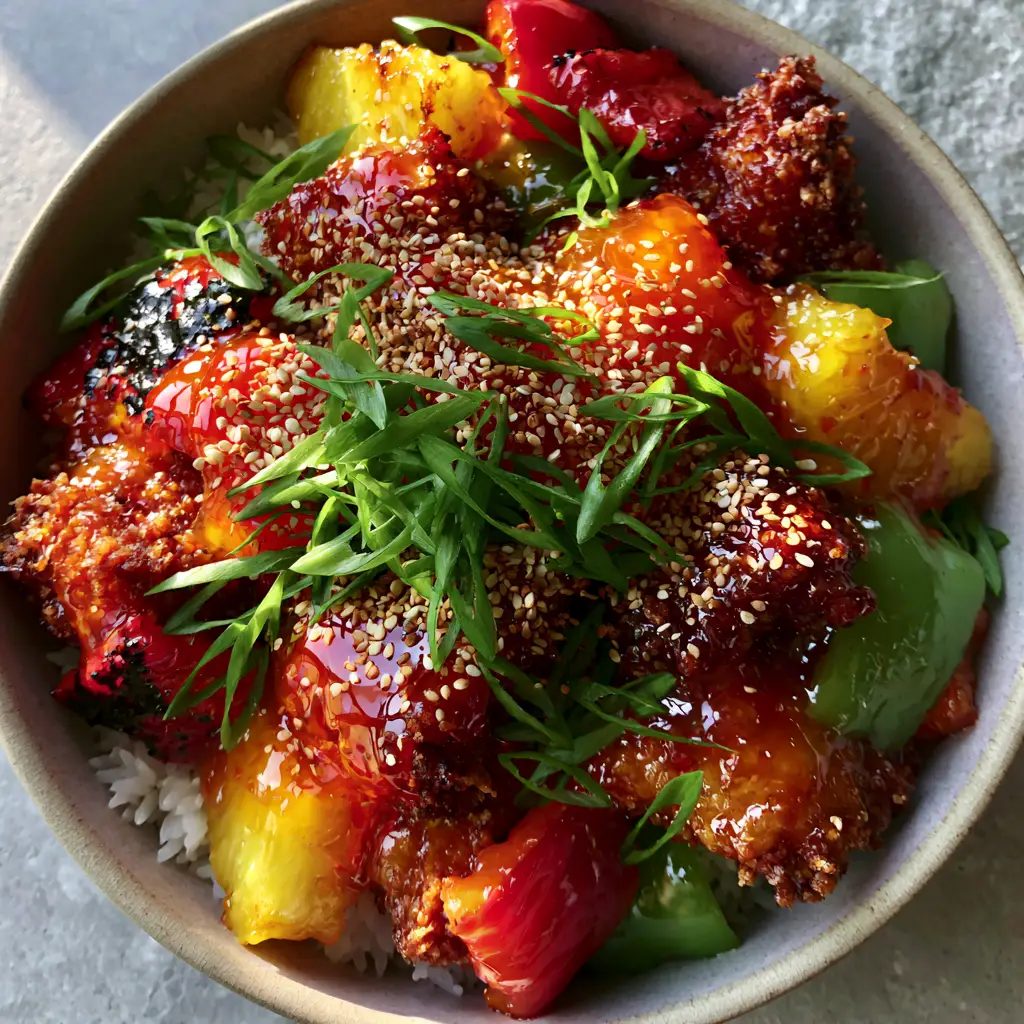
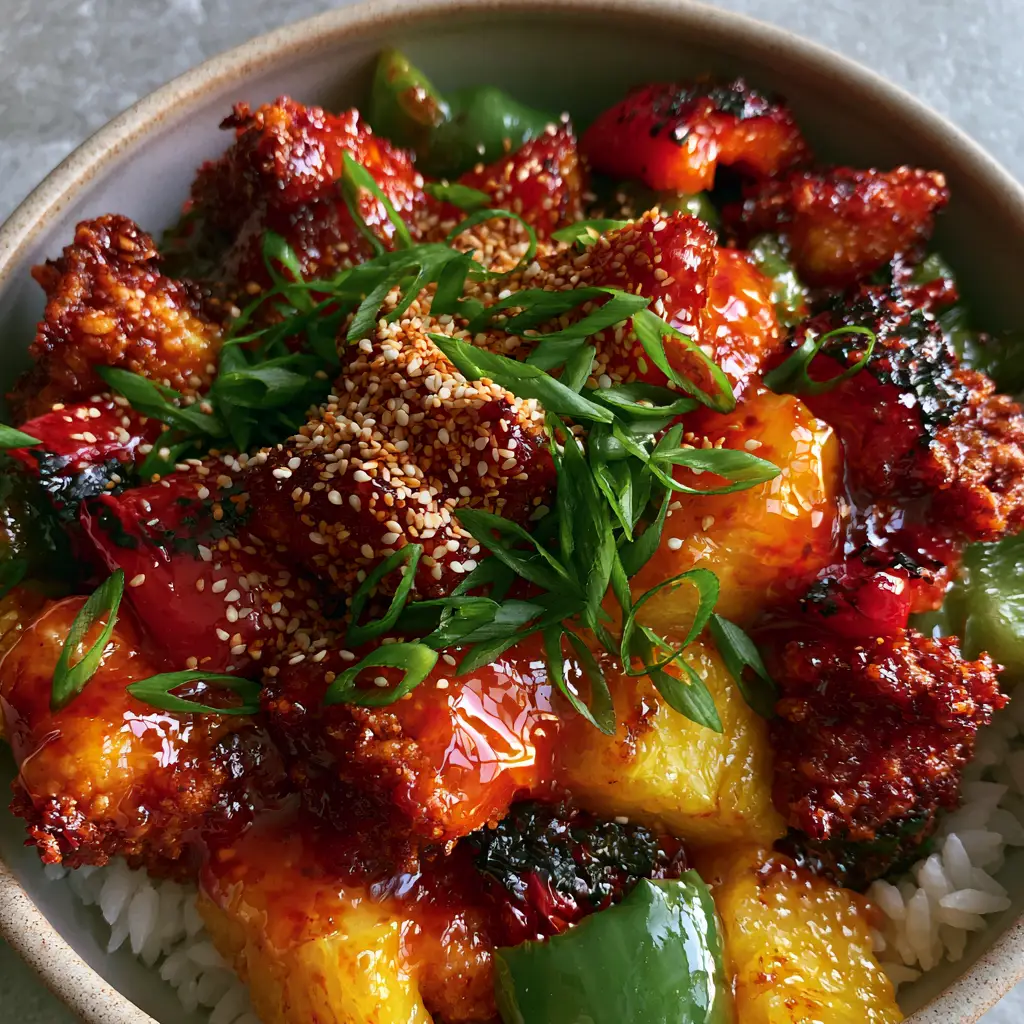
The perfect sweet and sour chicken recipe is often considered the “Holy Grail” of Chinese-American takeout. We have all experienced the disappointment of soggy, flavorless nuggets swimming in a neon-pink syrup. However, the visual promise of a truly elite dish is unmistakable: a modern ceramic bowl brimming with craggy, golden-brown chicken pieces, each one encapsulated in a thick, translucent, vibrant red-orange glaze that reflects light like a polished gemstone.
To achieve this at home, we must bridge the gap between amateur frying and professional culinary physics. This isn’t just about mixing sugar and vinegar; it is about the textural contrast between the charred red bell pepper chunks and the juicy, caramelized yellow pineapple wedges. When you see those individual grains of steaming white jasmine rice peeking out from under the sauce, you know you have mastered the art of the stir-fry.
Why This Specific Sweet and Sour Chicken Recipe Outperforms Takeout
- The Craggy Texture: By using a specific ratio of cornstarch to flour, we create a crusted surface with “nooks and crannies” that grab onto the sauce without losing their crunch.
- Reflective, Glossy Glaze: We avoid murky sauces by using a clarified pineapple juice base and a perfectly timed cornstarch slurry to ensure the red-orange hue remains translucent and vibrant.
- Caramelized Flavor Profile: Instead of raw fruit, we sear our pineapple wedges until they develop a golden-brown crust, intensifying their natural sugars.
- Visual Balance: The contrast of bright green scallions and toasted white sesame seeds provides a fresh finish that cuts through the richness of the glaze.
Essential Ingredients for the Ultimate Glossy Red-Orange Glaze
Every ingredient in this sweet and sour chicken recipe serves a dual purpose: flavor and structural integrity. To achieve that signature reflective coating, you need the right chemical balance of acidity and sugar.
Chicken Thighs or Breast: 1.5 lbs (680g) of boneless chicken. While breasts are traditional, thighs remain juicier under the high heat required for that craggy golden-brown breading.
Cornstarch (Cornflour): 1 cup (125g) for the breading and 1 tbsp (8g) for the slurry. This is the secret to the “craggy” texture; cornstarch prevents gluten development, ensuring a shatteringly crisp shell.
Rice Vinegar: 1/2 cup (120ml). This provides the sharp, clean “sour” note that balances the heavy sugars without the harsh chemical aftertaste of white vinegar.
Granulated Sugar: 3/4 cup (150g). Sugar isn’t just for sweetness; it creates the viscosity and “tack” that allows the sauce to cling to the breaded chicken pieces.
Ketchup: 1/2 cup (120ml). This provides the base for the vibrant red-orange color and contributes lycopene for body and a hint of umami.
Pineapple Juice: 1/2 cup (120ml). Using the juice from the canned pineapple ensures a cohesive flavor profile between the fruit and the glaze.
Aromatic Base: 2 cloves of minced garlic and 1 tsp (5g) of freshly grated ginger. These invisible ingredients provide the depth of flavor that separates home cooking from industrial production.
The Produce: 1 large red bell pepper and 1 large green bell pepper, cut into 1-inch (2.5cm) chunks, along with 1 cup (165g) of pineapple wedges. We are looking for “charred” and “softened” textures respectively.
Tools Required for Professional Culinary Results
To achieve the visual cues in our sweet and sour chicken recipe, you need tools that can handle high-intensity heat. A heavy-bottomed wok or a large cast-iron skillet is non-negotiable for searing the peppers to get those charred edges.
You will also need a digital thermometer to ensure your frying oil stays at exactly 350°F (175°C). If the oil drops too low, the breading becomes greasy rather than craggy. A wire cooling rack is also essential; placing fried chicken directly on paper towels traps steam, which will destroy the golden-brown crust you worked so hard to create.
Step-by-Step Instructions to Achieve the Perfect Craggy Texture
1. Preparing the Signature Craggy Breading
Pat your chicken pieces completely dry with paper towels. Whisk 2 large eggs in a bowl. In a separate shallow dish, combine your cornstarch, 1/2 cup (60g) of all-purpose flour, 1 tsp (5g) of salt, and 1/2 tsp (2g) of white pepper.
Dip the chicken in the egg, then dredge thoroughly in the flour mixture. Press the coating onto the chicken firmly. This “pressing” action is what creates the irregular, craggy surface seen in our visual blueprint.
2. The Double-Fry Technique for Golden-Brown Perfection
Heat 2 cups (480ml) of neutral oil in your wok. Fry the chicken in batches for 3-4 minutes until they reach a pale golden hue. Remove and let rest for 2 minutes.
Increase the heat slightly and flash-fry the chicken a second time for 60 seconds. This second fry drives out residual moisture, resulting in that deep, golden-brown craggy breaded texture that stays crispy even after being tossed in the thick sauce.
3. Searing the Peppers and Caramelizing Pineapple
Wipe out most of the oil, leaving about 1 tbsp (15ml). Turn the heat to high. Add the red bell pepper chunks and pineapple wedges. Look for the visual cue: you want “charred” black spots on the peppers and a “caramelized” golden edge on the pineapple.
Add the green bell pepper slices last, sautéing only until they are “softened” but still retain their vibrant color. Remove the produce from the wok and set aside.
4. Building the Thick, Reflective Red-Orange Sauce
In the same wok, combine the vinegar, sugar, ketchup, pineapple juice, and soy sauce. Bring to a simmer over medium heat. Whisk your cornstarch slurry (1 tbsp cornstarch mixed with 2 tbsp water) and pour it slowly into the bubbling liquid.
Watch as the sauce transforms from cloudy to translucent. It should become thick and glossy, with a reflective surface. Once it coats the back of a spoon, it is ready for the final assembly.
Expert Tips for Success
- The Temperature Rule: Never crowd the pan when frying. This causes the oil temperature to plummet, leading to soggy breading.
- Freshness Matters: While canned pineapple provides the necessary juice for the sauce, ensure you drain the wedges well before caramelizing to avoid steaming the peppers.
- The Sauce Toss: Only toss the chicken in the sauce immediately before serving. This preserves the “craggy” texture for the longest possible time.
- Slicing Scallions: Slice your scallions on a sharp bias (diagonal). This increases the surface area, making the “bright green” color pop against the red-orange sauce.
Storage, Reheating, and Freezing
Leftover sweet and sour chicken recipe portions can be stored in an airtight container for up to 3 days in the refrigerator. However, the breading will naturally soften over time as it absorbs the moisture from the glaze.
To reheat and reclaim some of that crunch, avoid the microwave. Instead, place the chicken in an air fryer at 350°F (175°C) for 4-5 minutes, or on a baking sheet in a conventional oven. Freezing is not recommended for the fully assembled dish, as the peppers lose their structural integrity upon thawing.
What to Serve with This Vibrant Stir-Fry
To balance the intensity of the sweet and sour glaze, serve this dish over a bed of fluffy, individual grains of steaming white jasmine rice. The rice acts as a neutral canvas for the vibrant sauce.
If you are looking for a complete Asian-inspired feast, consider pairing this with a side of Thai Basil Chicken for a spicy contrast, or perhaps some sauteed asparagus and mushrooms to add an earthy note to your meal. For those who enjoy fruit-forward poultry, our Hawaiian Chicken offers a similar tropical profile. If you’re in the mood for something lighter before the main event, a simple avocado toast with a dash of soy sauce can be a surprisingly good starter.
Frequently Asked Questions
Yes, you can air fry the breaded chicken at 400°F (200°C) for 12-15 minutes, spraying generously with oil. However, for the most authentic ‘craggy’ texture and golden-brown color, traditional deep frying is recommended.
Absolutely. Fresh pineapple provides a superior texture when caramelized. Just ensure you have 1/2 cup of unsweetened pineapple juice on hand for the sauce base, as you won’t have the ‘syrup’ from a can.
The secret is the ‘double-fry’ method and using a high ratio of cornstarch in the breading. Cornstarch creates a crispier, more durable shell than flour alone. Always toss the chicken in the sauce just seconds before serving.
The color comes naturally from the combination of ketchup and the yellow hue of pineapple juice. Some restaurants use red food coloring, but our recipe achieves a glossy, natural vibrancy through caramelization and high-quality ketchup.
Cloudy sauce usually happens if the cornstarch slurry isn’t cooked long enough or if too much ketchup/soy sauce is used relative to the liquid. Ensure the sauce reaches a full simmer after adding the slurry to ‘clear’ the starch.
The Ultimate Sweet and Sour Chicken Recipe Card
Sweet and Sour Chicken Recipe: The Secret to Ultra-Crispy Craggy Chicken
Ingredients
Equipment
Method
- Pat chicken dry. Dip in whisked egg, then press firmly into the cornstarch and flour mixture to create craggy ridges.
- Fry chicken in 350°F (175°C) oil for 3-4 minutes until pale golden-brown. Drain on a wire rack.
- Increase heat and fry again for 60 seconds until a deep golden-brown, craggy crust forms.
- In a hot wok, sear red bell peppers and pineapple wedges until charred and caramelized. Add green peppers until softened.
- Simmer vinegar, sugar, ketchup, and juice. Whisk in cornstarch slurry until the sauce is thick, translucent, and glossy.
- Toss the crispy chicken and charred produce in the reflective glaze. Garnish with scallions and sesame seeds.
Notes
Double-fry the chicken for a crust that stays crispy even under the heavy sauce.
Closing & Call to Action
Mastering this sweet and sour chicken recipe is about more than just following steps; it is about paying attention to the sensory cues—the sound of the sizzle as the pineapple caramelizes and the sight of the translucent glaze thickening in the wok. This dish brings the restaurant experience directly to your kitchen with far better ingredients and a superior crunch.
If you enjoyed this culinary deep-dive, please leave a comment below and let us know how your craggy chicken turned out! Don’t forget to share your creations and follow us on Pinterest for more visually stunning recipe inspiration.